Monday, December 5, 2011

Photography: First Picture Print Made


The First Picture Taken
Joseph Nicephore Niepce’s had not only passion but talent. He not only helped to create the world of photography, but made it wildly popular. He is known for his 1827 photographic image.


He used the camera obscura, which was mostly used for illustration or tracing. But trough time, and Joseph Niepce’s, it was made easily portable and printable. He called it the sun print. He was able to print images on photosensitive paper.


It would usually take eight hours to produce one image. The prints were very fragile, and eventually faded. The quality and durability of picture prints were eventually improved during the coming years.


It is because of Joseph Nicephore Niepce’s  work, and many others, that we are able to enjoy our memories today. He showed us a different view. Niepce's helped to improve our vision, and changed our minds towards the beauty that surrounds us in our everyday lives. 


Photography: First Camera Ever Made


First Camera Ever Made
Through time, cameras have been created, improved, and sold. But, who created the camera? Who do we give our gratitude for this wonderful creation?  A creation that preserves our memories, gives us insight about other parts of the world (what they look like), and inspires us artistically.  
Well this is a hard question to answer. The reason is, because it was though a lot of collaboration. Though time, great scientist, and great minds. We have the luxury to keep our pasts. Because of these great individuals (just to name a few) Aristotle, Theon of Alexandria, Al-Kindi, Mozi, and Alhazen; we can now see the world in many different ways.


The Camera Obscura
The camera obscura Latin for “dark room” was a device which projected images of its surroundings. Originally a large dark room completely sealed from light except for a very small pinhole from which external light came through.   Producing upside down images that were traced and used for art sketches, drawing, and viewing.
Through time, a smaller and more portable camera obscura was created. And even today the making and design of the camera is still improving!


Sunday, November 20, 2011

Photography: The perfect camera?

Photography


What type of camera is best for you?
There are many cameras to choose from, but all are not made equal. And how to choose that perfect camera that is right for you can be a little difficult.
Here are some key factors that should weigh in on your gift list for this Holiday.
o   Mega pixels
o   Zoom
o   Sensor Size
o   Scene Modes
o   Shooting Modes
o   Accessories


Sunday, November 13, 2011

Photography: Photo Merge


Photo Merge:


Photo Merge

In photography there is a technique called photo merge. It is used to capture big canvases.  It is a creative way to capture a large areas without loosing any of its space. It is a wonderful technique to learn and use when traveling, or around big cities.
Here is a video link that will show how to exactly go about photo merge:


It is a way to capture large areas without losing the sharpness of that image.  

There are many different programs in which photographers merge, but I use Photoshop. Why? It is simple, lot of tools, and very professional.

Here are some pictures to give an example of the type of photos that can be achieved by using photo merging.    

I will also link a tutorial of photo merging, in the Photoshop program. Please go back to the top.  


Sunday, November 6, 2011

Photography: Elements and Principles

Elements and Principles of Art in Photography

There are many building blocks towards the elements of art. It is important to understand all types of art forms. Today, I will discuss only three of them Line, Space, and Texture. It is very important to understand these three basic building blocks. Why? As you can see here in these beautiful pictures, they can make a huge difference, capturing something wondrous.  It is all about detail and more details.
There are many factors in photography; especially when it is artistic photography.
Lines
  • A mark with length and direction.
  • A continuous mark made on a surface by a moving point.  

Space
  • The distance or area between, around, above, below or within things.
  • Foreground, Middle ground and background (create DEPTH).


Positive Space -(filled with something) and Negative (empty areas)


Texture
  • The surface quality or “feel” of an object, its smoothness, roughness, softness, etc. Textures may be actual or implied.


Sunday, October 30, 2011

Photography Restoration

Photo Restoration
Digital photo restoration is a simple technique that many people can do themselves. It can help replace historic pictures or restore family history.

Whether it is a torn edge, damaged corner, creases, cracks, water stains, rips and tears,  or color loss, everyone can learn how to restore a photo.

By using Photoshop we can alter certain aspects of a photograph, and improve the overall quality making a dramatic change to our memories. 

                                 Because it is a little difficult to explain how to use these tools, and it is better to see how they can be used, please check-out this tutorial I found from Youtube!

There are 4 tools                                         Check-Out this Tutorial

v  Spot Healing Brush Tool

v  Healing Bush Tool

v  Patch Tool

v  Red Eye Tool

(My Favorite)

Ø  Clone Stamp Tool  

Ø  Pattern Stamp tool

Helpers:

*      Bur Tool

*      Sharpen Tool

*      Smudge Tool

*      Eraser Tool


Sunday, October 23, 2011

Portraiture

Portraiture
It is very difficult to capture a likeness or a predominant expression.  A feeling that overpowers everything else that might be included in a background or even the other parts of that same object.
Detail
In portraiture it is all about detail. For example, the hands of a pianist, the bicep of a weight lifter, the belly of a pregnant woman. Try to capture details that would get the message across in an indirect way.


Techniques
Try to use different elements to abstract what you want from your objects. 
 Here are some examples:

Ø  Back-lights

Ø  Posing

Ø  Shooting from unusual angles

Ø  Framing and Positioning your subjects

Ø  Culture (Environment  )

Ø  Interesting Locations

Ø  Reflections

Ø  Shadows

Ø  Get Close

Ø  Blur the background

Ø  Capture the moment

Ø  Get Serious

Ø  Use PROPS
(this helps a lot)

Ø  Use COLORS

Ø  Shoot longer exposures

Ø  Use shape an line or strong compositions

Ø  Use selective focus

Ø  Take Non-traditional approach

Do not be afraid to go outside the box! Portraiture is not a simple thing to conquer. It is just like all the other techniques in photography. It takes a lot of practice and creativity.    

Sunday, October 16, 2011

Selective Color Photography

Selective Color

It is to produce a black and white image that contains a hint or a splash of color. There are several ways to make an image black and white. I will be showing how to create a selective color photograph with channel mixer and gradient map in Photoshop.

Instructions


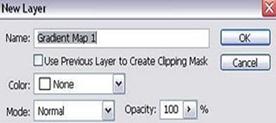
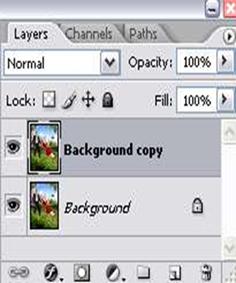
Ø  On Photoshop- Open your image and duplicate the image layer.

Ø  With the duplicated layer pallet, got to Layer> New Adjustment Layer> Channel Mixer. On the first pop-up window, click OK.

Ø  Then, you’ll see the channel mixer window. Check the Monochrome box. Adjust the Red, Green, Blue, and Constant settings. Each image will have different settings. Experiment with the values until you find the perfect fit for your image.

Ø  Sliding the slider to the right will bring out the white and sliding it to the left will increase the black on your image.

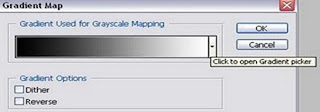
Ø  Next, go to Layer> New Adjustment > Layer> Gradient Map. Click OK on the first pop-up window. Then select the Black and White gradient, and click OK. Now you should have a black and white image.

Ø  Next, click on the eye icon to the left to make the original image invisible. Set the original layer back to the visible by clicking the box where the eye icon is, then click CTRL+SHIFT+E to merge all the visible layers. Now, you have a black and white image.

Ø  With the black and white layer selected on the layer palette, click the >Add Vector Mask> icon at the bottom of the layer palette. Make sure the foreground color is set to black, and the background color is set to white. If it’s not, click D on your keyboard to set it to default, and use the small arrow to switch back and forth between background and foreground color.

Ø  Select the brush tool and choose a soft round brush. Set the brush size depending on the size of your image, then just paint on the area where you want the color  to be visible with color.

Ø  From the picture  you’ll see that the read   
Tip

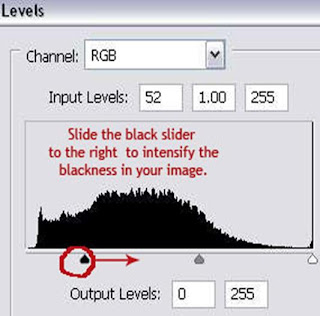
If the selective color is not as intense as you would prefer, and want more vibrancy.  With the original background layer selected in the layer palette, go to Layer> New Adjustment > Layer > Levels and adjust to likening.

Sunday, October 2, 2011

Action Photography

Action Photography

It is not just about the subject, but the environment that makes an Action Photography stand out.  There are two types of Action Photography Stop Action: fast shutter speed (freeze motion), and Capture Motion: slower shutter speed (blur motion).  Here are some key elements that help to capture this amazing Action Photographs:   


                               (Freeze Motion)                                                                              (Blur Motion)

Key Elements

§  Planning
§  Practice reactions
§  Pre-focusing
§  Anticipation
§  Pan
§  Shoot Warm-ups
§  Knowledge of you ‘re subject

Action Photography is one of the hardest things to capture because timing is so critical. Even the pros take dozens of shots to get one perfect picture.

Continuous Mode

This mode (continuous burst mode) lets you take photos in a rapid sequence. Continuous Modes are very useful to photograph unpredictable moving subjects, or to capture movement in a series of images.  Take time to practice these techniques with your camera.   

Sunday, September 25, 2011

Night Photography


Night Photography
          Night photography is nothing less than awesome! There is something about lights; they are such an attraction to us. We love their colors, they are worm and happy. From cities such as, New York to holidays like Christmas.  


What you Need 
          For successful night photography, you need a camera that allows you to keep the shutter open for a long time. It can be anywhere from 3 to 30 seconds. If your camera provides shutter-priority or available to switch to full manual mode - this will surly give you even a longer shutter speed.  (Mandatory: Tripod - When shutter stays open for a long time, the camera needs to be kept rock steady, otherwise you will end up with blurred images!)

Extras: If you’re buying a camera, and discovered you’re a night photography lover, then make sure your camera features a self-timer or ideally a remote controller to depress camera shake.

Self-Test
         Take as many shots as you can at different shutter speeds. Also, check your aperture, the smaller the better. For example, f16 or f22 generate a sharper image and preserve a large depth of field, creating a deep focus. Immediately review the shots as soon as have you’ve taken picture.


About Me

About Me

Welcome to my blog!  My name is Arely Tamez-Cabrera, and I am from San Antonio, TX.  My blog is about photography, and how to use professional trick and tips, so that a regular average Joe like myself at one point, is able to create a pretty decent photograph. As a Multimedia mayor, I was required to learn about photography, and taught to apply basic photography skills, at a beginner professional level, throughout a sixteen week course.  From studying, passing, and applying my Photography skills; I was and I am able to not only teach others, but also assist others with any problems they might occur during their field shots (camera adjustments).  If you feel like you need help in this area, please feel free to contact me at a_5t@yahoo.com or call me at 555-555-0005. I look forward to hear from you.

Sunday, September 18, 2011

Micro Mode

Micro Photography

What is it?
It is close up photography. Where the image projected  on film is close to the same size as the subject.
Where to find it on camera mode?
Macro mode is generally symbolized with a little flower; when selected it will tell your camera that you want to focus on a subject closer to your lens than normal.
Focusing
Working in Macro mode is somewhat different than working at normal distances. After roughly focusing and composting an image, it is often easier to finish focusing by moving the entire camera father away of closer rather than refocusing the lens .  Focus on the part of your subject that is the main point of interest.
Did you know?
The Micro mode is most useful in forensic work, where small detail at crimes or accident scenes may often be significant. Trace evidence such as fingerprints and skid marks are especially important, and easily recorded using Micro mode.  But, besides this type of use, Micro mode can be acquired in order to make the most beautiful piece of artwork.
Why would one like to use Micro?
I like Micro mode mainly because I am an outdoor type of person. I love catching squirrels on the act, or any type of bugs, or insects. I do not like to touch those things, but I do love their colors. Plants are also another subject I like to take photos of, and not to mention the sky. Personally, to me Micro is for those types of individuals who love detail and colors.  

Sunday, September 11, 2011

The great "Rule of Thirds"

How to take an awesome picture

Simplicity should be one of the first things individuals should think about, when composing a photograph. Keep your image clutter free, and remember that as a photographer, you want to draw the viewer’s attention to the main subject of the photo as quickly as possible. With the Rule of Thirds, now offered by most cameras, it makes it easier to position the most important element in your scene along two-thirds up the page. The human eye is naturally drawn to this point. If your camera does not provide a Rule of Thirds, then imagine that your image is divided into nine equal segments by two vertical and two horizontal lines. The goal is to get your main subjects around one of the intersection points rather than the center of the image, which is the traditional way.  Most people like myself, find it difficult to stray away from the center shot, but it is very important to capture different angles, and  learn different technics to improve our photography skills. Again, try to position the most important element in your scene along these lines, or at the points where they intersect. Doing this will add balance, and interest to you photo, making it easier to capture an amazing shot.  

Sunday, August 28, 2011

Why am I choosing photography as my topic for this multimedia writing class?

Hi,
     I have no idea why I am choosing photography as my topic for this class, I think it's because I took a photography class, but i never had the time to really learn all what I wanted to learn from it. The teacher was great, but I never had the time to make some beautiful pictures. I never used more than one or two picture settings. I think this will be a great way for me to relearn all the different camera settings that I should had practiced.